Usage
Prepare installation files
Prepare a working folder.
Create a folder in the working folder with one of the names
atozand place the necessary files and/or folders in the created folder.EWE interprets the
atozfolders as the root folders of the A to Z drives.The drive type is determined by the folder name as shown below.
Folder name Drive type a、bRemovable drive cFixed drive d~zOptical drive If you want the application to play CD-DA audio tracks, put the files named
trackNN.ogg(NN=02-99) under the working folder (not under thed-zfolders).
Create a file named
config.txtin the working folder and write the necessary settings into it.The setting is described by connecting "key" and "value" with
=.At least the command line must be specified. An example is shown below.
cmd_line=C:\app.exe option1 option2The executable filename should be specified as a full path, with arguments separated by spaces if necessary.
In addition, the following settings can be configured in
config.txt.Key Description Value Default Example bppColor depth (bits) 816243232bpp=8desktopDesktop size (*1) xgadesktop=vgacdvolumeCD volume label Any string (None) cdvolume=VOLUMEsoftkey1~8Soft key (*2) (None) softkey5=2,rclick.png(*1) The values that can be specified as the desktop size are as follows.
Value Size qvga320 x 240 pc98640 x 400 dcga640 x 400 vga640 x 480 svga800 x 600 xga1024 x 768 (*2) The definition of a soft key is as follows.
softkey<n>=<vkey>,<filename1>[,<filename2>]Field Description Value <n>Position 1~8<vkey>Virtual key code (*3) 1~255<filename1>Image file (1) (*4) Filename <filename2>Image file (2) (*4) Filename <n>Position (x, y) 1(0, 0) 2((screen_w - key_w) / 2, 0) 3((screen_w - key_w), 0) 4((screen_w - key_w), (screen_h - key_h) / 2) 5((screen_w - key_w), (screen_h - key_h)) 6((screen_w - key_w) / 2, (screen_h - key_h)) 7(0, (screen_h - key_h)) 8(0, (screen_h - key_h) / 2) (*3) Please refer to the following URL for the virtual key code.
https://learn.microsoft.com/en-us/windows/win32/inputdev/virtual-key-codes- The value must be specified in decimal.
- When a soft key with
1to254is pressed, the specified virtual key code is sent. - Pressing a soft key with
255will enable/disable other soft key operations.
(*4) The image files should be placed in the same directory as
config.txt.- PNG images are available.
- If
1to254is specified for the virtual key code, the image specified in<filename1>will be displayed. - If
255is specified as the virtual key code, the image specified in<filename1>is displayed if soft key operation is disabled, and the image specified in<filename2>if soft key operation is enabled.
Create a folder named
_fontsin the working folder and place the TrueType format font files in the folder.EWE determines the font type from the filename.
Filename Font type sans_m.ttfSans-serif (Monospaced) sans_p.ttfSans-serif (Proportional) sans_ui.ttfSans-serif (for UI) serif_m.ttfSerif (Monospaced) serif_p.ttfSerif (Proportional) EWE does not use the font names embedded in the font data.
Instead, create a file namedalias.txtin the_fontsfolder and describe the mapping between each file and font name.
The following is an example for a English environment. The file should be saved in UTF-8 format (without BOM).sans_m=Lucida Sans Typewriter sans_p=Arial sans_ui=Tahoma serif_m=Courier New serif_p=Times New Roman
Place a PNG image file named
appicon.pngin the working folder.- EWE displays this image file as an application icon.
- The image file should be 64 x 64 in size.
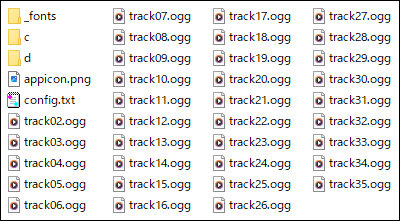
An example of a file list is shown below.
Create an archive file
When the installation file is ready, create a ZIP archive file.
As a caution, files must be stored uncompressed.
Here is an example of using 7-zip.
Note that the 7-zip installation procedure is omitted.
Select all files in the working folder and right click > select "7-zip" > select "Add to archive...".
Make the following settings and click the
 button.
Item Value Archive (App name).zip Archive format zip Compression level 0 - Store 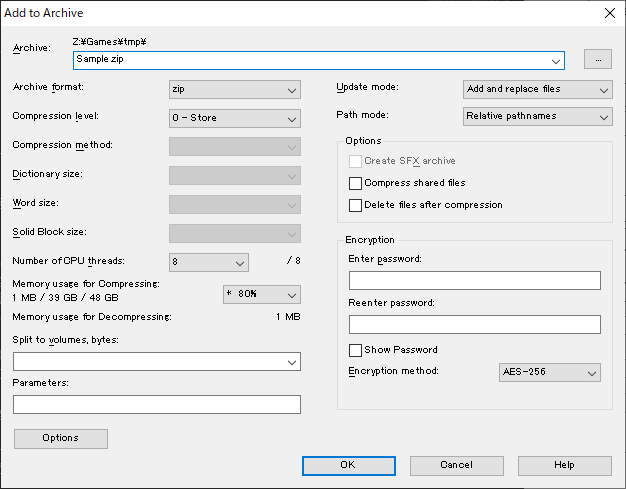
Install
Once the archive file is created, let's actually install it.
Two installation methods are available.
- Download via network
- Copy directly to the local file system (Lite version not supported)
Download via network
It is possible to download archive files from the application menu using either TFTP, FTP or HTTP communication protocols.
Here are the instructions for downloading via the TFTP protocol using Tftpd64.
Note that the Tftpd64 installation procedure is omitted.
Start Tftpd64 and click the
 button to specify the folder for the archive file.
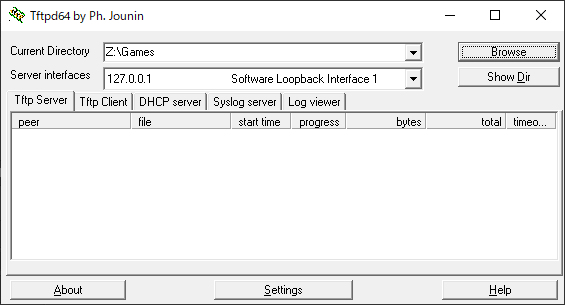
Start EWE and select
 from the menu to display the installation dialog.
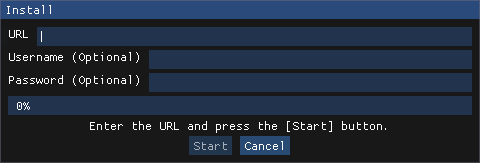
Enter the URL in the dialog and click the
 button to begin installation.
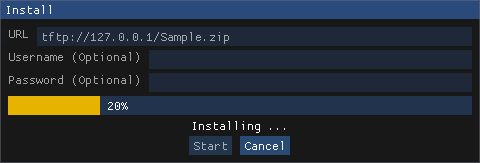
When the installation is complete, click the
 button to close the dialog.
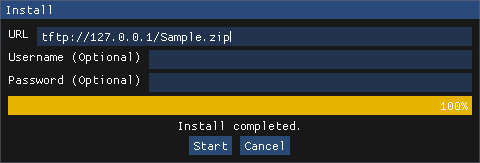
The installation is successful when the application icon appears.

Copy directly to the local file system (Lite version not supported)
Windows
Use Explorer to copy the archive file to the Applications folder.
iOS
Use the Files app to copy the archive file to the Applications folder.
Run
Click/tap the application icon to launch the application.
The method of operation while the application is running depends on the operating system.
| EWE | Windows / Linux / OSX | iOS / Android |
|---|---|---|
| Mouse move | Mouse move | Swipe (1-finger) |
| Mouse click (L-button) | Mouse click (L-button) | Tap (1-finger) |
| Mouse click (R-button) | Mouse click (R-button) | Tap (2-finger) |
| Show soft keys | Mouse click (M-button) | Tap (3-finger) |
| Show the System UI | Mouse M-button press and hold | Tap and hold (3-finger) |
To quit the application, show the System UI and select  .
.
Several settings can be changed in the system UI.
- CPU Usage
... Limiting the interpreter's CPU usage can reduce battery consumption. - Display
... Switches the display orientation of the application. This is particularly useful for applications that are used with the monitor in portrait orientation.
You can also review the following information in the System UI.
- System version (build date and time)
- Debugging information (CPU register values and error contents are also displayed when emulation is stopped)
- OSS license notices
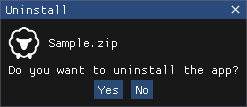
Uninstall
Press and hold the application icon to display the menu and select
 .
.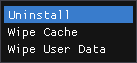
When the following dialog appears, click
 .
.
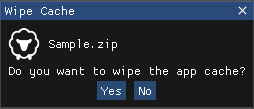
Wipe cache
Press and hold the application icon to display the menu and select
 .
.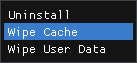
When the following dialog appears, click
.
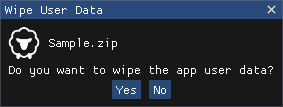
Wipe user data
Press and hold the application icon to display the menu and select
 .
.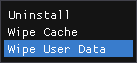
When the following dialog appears, click
.